Sua posição: Página inicial > Disposable material
- Descrição
Especificações
 Please read all information carefully.
Failure to properly follow the instruction may lead to serious surgical consequence.
【Indications/Intended Use】
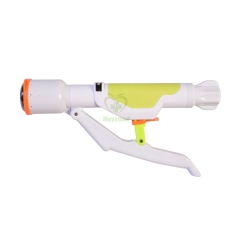
Disposable Circumcision Stapler is intended for the controlled removal of the foreskin of the penis during circumcision.
【Contraindications】
*Patients with deformed prepuce and glans penis (including patients whose prepuce and glans penis are widely and closely adhered;
*Patients whose prepuce and glans penis are with infection or edema;
*Patients with penile cancer;
*Patients with underlying diseases (such as hemorrhage tendency, hypoproteinemia, low serum albumin, severe cardiovascular disease, etc.) and other contraindicated patients such as with mental illness, etc;
*Cautiously used for scar physique.
【Warnings】
*The stapler can be used for only single use and products with damaged packaging or quality problems are prohibited for use;
*Operate with circumcision staplers of different specifications according to the size of glans penis;
*Staplers shall be strictly placed and disposed in according with medical garbage after being used;
*It is prohibited to use smaller stapler instead of larger ones to conduct operation;
*Sexual life is prohibited within one week after all suturing nails fall off;
*Before healing, the patients have to orally take estrogen prescribed by the doctor to control the erection of penis;
*Strenuous exercises are prohibited before healing.
【Precautions】
*The staplers can only be used by doctors who are proficient with the surgical technique;
*For patients with glans penis cohesion, frenulum or other abnormities, treatment and hemostasia shall be conducted first and then the stapler can be used;
*In case of edema or hematoma after the surgery, time treatment shall be done;
*All staplers are sterilized provided that it is unopened and with complete packaging, please check the packaging before use. Do not use if the packaging is damaged;
*The stapler can be used only for single use.
【Device Description】
Disposable Circumcision Stapler has type A and type B according to the shape of firing handle, type A is single handle, and type B is double handle. And every type has different size, i.e. 12mm, 15mm, 18mm, 22mm, 26mm, 30mm, 32mm, 34mm and 36mm.
Details the schematic sketch of the circumcision stapler as following:
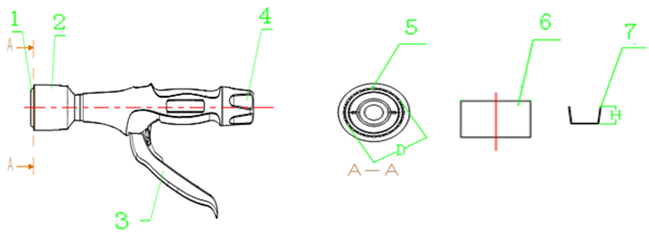
1. Cap; 2. Cartridge Cover; 3. Firing Handle; 4. Adjusting Knob; 5. Cartridge; 6. Cutting Knife;7. Staple
Fig. 1 Type A of Disposable Circumcision Stapler

1. Cap; 2. Cartridge Cover; 3. Firing Handle; 4. Adjusting Knob; 5. Cartridge; 6. Cutting Knife;7. Staple
Fig. 2 Type B of Disposable Circumcision Stapler
Circumcision Staplers specifications:
| Types | D | Tol. | H | Tol. | Quantity of Staple |
| RYB-(A)12 | 17.2 | ±2 | 3.5 | ±0.5 | 10 |
| RYB-(B)12 | |||||
| RYB-(A)15 | 19.2 | 11 | |||
| RYB-(B)15 | |||||
| RYB-(A)18 | 22.2 | 13 | |||
| RYB-(B)18 | |||||
| RYB-(A)22 | 26.2 | 16 | |||
| RYB-(B)22 | |||||
| RYB-(A)26 | 29.2 | 18 | |||
| RYB-(B)26 | |||||
| RYB-(A)30 | 33.4 | 20 | |||
| RYB-(B)30 | |||||
| RYB-(A)32 | 36.2 | 22 | |||
| RYB-(B)32 | |||||
| RYB-(A)34 | 37.4 | 24 | |||
| RYB-(B)34 | |||||
| RYB-(A)36 | 41 | 26 | |||
| RYB-(B)36 |
1)Select appropriate staplers through conventional measuring method. The patient shall lie down horizontally and be operated with local anaesthesia, sacrum anaesthesia or other effective ways of aneasthesia;
2)For patients with prepuce adhesion, the adhesion shall be firstly peeled off and for patients with phimosis, the preputial orifice can be out (Note: the cutting shall not exceed the suture part in order not to affect suture) so as to put in the glans penis cover;
3)Screw out the adjusting nut and taken out the glans penis cover from the instrument (When they are tightly fixed, we can use the adjusting nut to gently push forward the glans penis cover.) Use common instruments such as hemostatic forcep to lift the prepuce and cover it on the surface of glans penis cover; after tensioning the inner plate, adjust the outer plate to the cut position; fix the prepuce onto the rod using ribbons or common suture and pay special attention to ensure the length of frenum. In case of patients with too long prepuce or children, the prepuce outside the ribbon or suture in order to cover the instrument. Before covering the instrument, gently take off the cover of nail cartridge in order to prevent suturing nails from dropping. Do not move the finger pushing the frenum during the operation. Insert the link rod to the central hole of the instrument to the end and gently screw the instrument with the right hand to ensure that the relatively thick blood vessel avoids the cutting groove at the head end of the instrument (This is the clearance between two suturing nails.) Hold the instrument with the left hand and mount the adjusting nut with right hand and screw it to the right position. When the tail end face of the rod is at the same level as the metal inserts of adjusting nut, it means the adjusting nut has been adjusted to the right position (In case the tissue of the patient is too thin or the patient is a child, the end face of the rod can be slightly protruded; otherwise, the end face of the rod can be slightly lower than that of metal insert.) (Note: when screwing out the adjusting nut, the action shall not be too fierce and try best to keep no rotation of glans penis to prevent tearing of the sutured position.).
4)Remove the safety clip; forcibly press the handle and when you hear a sound of “Bang” or feel obvious breakthrough, the trigger is at the right position. Hold if for about another 8~10s (In order to prevent capillary hemorrhage, the operated part can be wrapped with dry gauze.). And then release and screw out the adjusting nut. If the reset spring dose not reset after the hand is off, reset can be done by slightly pushing the handle outward. When the adjusting nut is screwed out for about 5mm, forward slightly to cut the suture position and observe whether it is completely cut off. In case some tissues are not completely separated, trim cut can be done to it. After the stapler is removed, immediately wrap up the operation part with dry gauze and press it for 3~5mins to prevent capillary hemorrhage at the wound or hemaoma after operation. If the pressing effect at the wound is not so good, local suture can be done. Wrap it up with dry gauze (or oil gauze when necessary) and appropriately bind it up with pressure bandage. Provided that impact is imposed to the patients’ urinating after operation, the patient shall be told to loosen the outer layer of the bandage and bind it well after urinating. In case no capillary hemorrhage happens two days after operation, the outer layer can be removed.
【Adverse Reactions】
After operation, the suturing nails may be not easy to fell off or hematoma and edema may happen.
【Package】
The instruments are sealed and packaged with blister box and coated paper, and supplied sterile for single patient use. Discard after use.
【Sterilization】
Ethylene oxide sterilization.
【Shelf-Life】
Three years after the date of sterilization.
【Transportation and Storage】
*Prevent the overweight pressure, direct sunlight and rain leaching during transportation.
*Products should be stored in no corrosive gas and well ventilated room with relative humidity of not more than 80% and the temperature not more than 54 ℃.
【Product Disposal】
After use, this product may be a potential biohazard. Handle and dispose of in accordance with accepted medical practice and applicable local, state and federal laws and regulations.
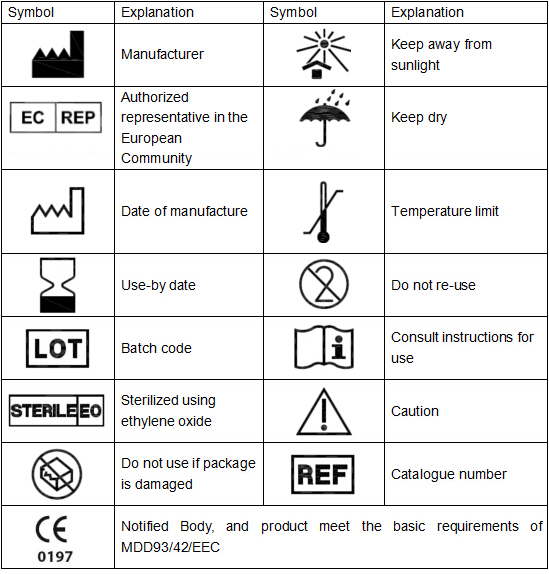
【Symbol Explanation】
 USD
USD EUR
EUR GBP
GBP CAD
CAD AUD
AUD HKD
HKD JPY
JPY BRL
BRL KRW
KRW CNY
CNY SAR
SAR SGD
SGD NZD
NZD INR
INR AED
AED MOP
MOP
